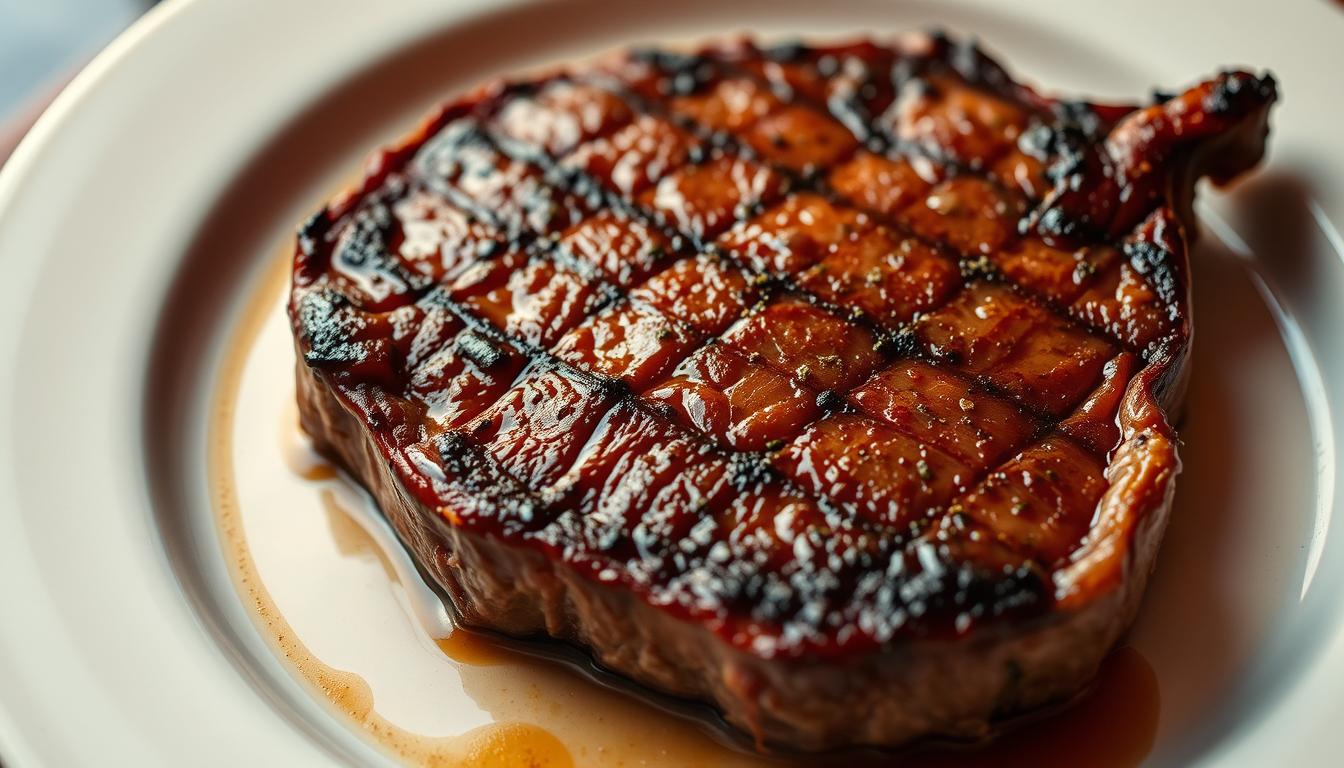
Did you know a single steak loses nearly 20% of its moisture during high-heat cooking? This shocking fluid loss occurs because muscle fibers contract violently when heated, squeezing out juices like a sponge. Understanding this process holds the key to transforming dry, chewy results into succulent masterpieces.
Raw cuts contain about 75% water bound within proteins. As temperatures rise above 120°F, these proteins tighten in both diameter and length. This dual compression forces moisture toward the surface and center, creating uneven distribution. Immediate slicing releases these trapped juices, leaving meat dry.
Strategic pauses after heating allow fibers to relax. Dissolved proteins gradually reabsorb escaping liquids, enhancing texture and flavor concentration. Professional kitchens use this principle daily – from prime rib to roasted vegetables – proving science and culinary art work hand in hand.
Key Takeaways
- Muscle fibers contract during heating, pushing moisture outward
- Proteins shrink dramatically above 120°F, causing uneven juiciness
- Pausing lets fibers relax and redistribute trapped liquids
- Dissolved proteins reabsorb moisture when undisturbed
- Proper timing improves tenderness and flavor intensity
The Importance of Resting for Flavor and Tenderness
Juice retention isn’t luck—it’s science applied through proper timing. America’s Test Kitchen Radio proved this by testing pork loin roasts at 400°F. Their findings reveal how strategic pauses transform cooking outcomes dramatically.

Enhancing Moisture Retention
Immediate slicing releases up to 10 tablespoons of liquid from cooked meats. But wait 40 minutes, and you’ll lose just 2.5 teaspoons—a 90% improvement. This happens because heat-relaxed muscle fibers reabsorb escaping juices like biological sponges.
| Rest Time | Juice Lost | Improvement |
|---|---|---|
| 0 minutes | 10 tbsp | — |
| 10 minutes | 4 tbsp | 60% less |
| 40 minutes | 2.5 tsp | 90% less |
Improving Overall Texture
Rushed carving creates tough, uneven texture. During resting periods, dissolved proteins redistribute evenly. This process makes every bite feel consistently tender. The result? Your meat retains both moisture and structural integrity.
Flavor compounds concentrate near the surface during cooking. A proper pause lets these intense tastes spread back through the meat. You’ll notice richer savoriness without added seasonings.
Why Some Foods Need Resting Time After Cooking

High-temperature preparation creates invisible battles within your ingredients. As proteins unravel under extreme heat, they form microscopic channels that push moisture toward cooler regions. This phenomenon explains why thick cuts develop juice pockets near their core when pulled from ovens or grills.
Pressure differentials drive this liquid migration. Surface areas reach temperatures exceeding 300°F during searing, while interior zones might stay below 140°F. Water molecules escape high-pressure zones through these temperature gradients, as detailed in recent heat transfer studies.
“Patience transforms physics into flavor – rushing this process steals your meal’s potential.”
| Cooking Method | Surface Temp | Rest Duration |
|---|---|---|
| Grilling | 500°F+ | 15-25 min |
| Roasting | 375°F | 10-20 min |
| Sous Vide | 130°F | 5 min |
Thicker cuts demand extended pauses. A 2-inch ribeye continues redistributing fluids for nearly 30 minutes post-grill. Thin cuts like flank steak require only 5-7 minutes – sufficient for surface proteins to relax without cooling excessively.
Vegetables exhibit similar behavior. Roasted eggplants release fewer bitter compounds when allowed to settle. Grill-marked zucchini holds its shape better after brief stabilization periods. These principles apply across protein-rich and plant-based dishes alike.
Understanding Carry-Over Cooking and Residual Heat
Your perfectly cooked roast could be overcooking right on your counter. This hidden process – called carry-over cooking – occurs because residual heat keeps working even after you remove food from its heat source. Thicker cuts act like thermal batteries, storing energy that continues raising internal temperature for several minutes.

The Science Behind Carry-Over Cooking
Heat moves from hotter exterior layers to cooler centers through conduction. A prime rib roasted at 325°F might gain 10-15°F during resting. This explains why chefs pull meat earlier than their target doneness temperature.
| Cut Type | Pull Temperature | Final Temp | Rest Time |
|---|---|---|---|
| Prime Rib (5 lbs) | 120°F | 135°F | 25 min |
| Pork Tenderloin | 135°F | 145°F | 10 min |
| Chicken Breast | 155°F | 165°F | 7 min |
Tips for Managing Residual Heat
Use these strategies to control temperature creep:
- Thicker cuts need earlier removal – up to 15°F below target
- Loosely tent with foil to slow cooling without trapping steam
- Check internal readings 3 minutes after removing from heat
High-heat methods like grilling create greater temperature spikes than slow roasting. A 2-inch steak gains 5°F resting on a plate versus 12°F when wrapped. Adjust your approach based on cooking technique and protein density.
Muscle Fibers, Juices, and the Science of Resting
Have you ever wondered why perfectly cooked meat transforms from juicy to dry in seconds? The answer lies in its microscopic structure. Muscle tissue behaves like a biological sponge, reacting to heat through precise chemical changes that determine your meal’s final quality.

How Heat Affects Muscle Proteins
Raw meat contains tightly coiled protein chains. When temperatures rise above 120°F, these muscle fibers unravel in a process called denaturing. Imagine stretching a spring – as amino acid bonds break, proteins contract lengthwise by up to 30%. This compression squeezes moisture toward cooler interior zones.
The Process of Juice Redistribution
Post-cooking cooling reverses the pressure gradient. Relaxing fibers create space for expelled juices to flow back outward. Cutting too soon interrupts this cycle, wasting flavor-packed liquids. A 10-minute pause lets 80% of moisture redistribute evenly through the meat.
Thicker cuts require extended stabilization. A 2-inch steak needs 15 minutes for complete fluid reabsorption, while chicken breasts achieve optimal texture in 7-10 minutes. This science applies equally to plant-based proteins like tempeh, which retain marinades better when rested.
Resting Techniques for Various Meat Cuts
Not all cuts demand the same patience at the finish line. Thickness determines whether your proteins need minutes or moments to stabilize. Master this distinction, and you’ll consistently serve juicy results instead of cold disappointment.

Guidelines for Thick vs. Thin Cuts
Thin cuts like chicken cutlets or flank steak lack mass for heat retention. Their quick cooking leaves minimal residual warmth. Simply transferring them to plates provides enough pause – slice immediately without losing juices.
Thicker cuts behave differently. A 1.5-inch ribeye continues cooking internally for 8-12 minutes off heat. Use this table to gauge resting needs:
| Cut Type | Thickness | Rest Duration |
|---|---|---|
| Pork chops | 3/4 inch | 3-5 minutes |
| New York strip | 1.5 inches | 10-12 minutes |
| Lamb rack | 2 inches | 15 minutes |
Grilled chops over 1 inch thick require 10-minute pauses. Fish fillets? Most need just plating time. Remember: extended waits chill thin cuts but transform thick ones.
When cooking multiple proteins, stagger completion times. Start thick steaks first, then grill chicken breasts. This ensures everything reaches the table warm while respecting each cut’s needs.
Temperature and Timing Guidelines for Optimal Rest

Mastering thermal dynamics separates good cooks from great ones. Proteins continue evolving after heat removal, making precise monitoring essential for both safety and quality. This balance requires understanding two critical factors: final doneness targets and pause durations.
Reaching Safe Internal Temperatures
Always remove meat 5-15°F below your target temperature. Carry-over cooking raises internal readings during rest periods. For example, chicken breasts pulled at 155°F will safely reach 165°F after 7 minutes untouched.
“Trust the climb – proteins keep cooking even off the heat,” advises Certified Master Chef John Henzel.
| Protein | Rest Minutes | Temperature Rise |
|---|---|---|
| Whole Turkey | 20-30 | 5-10°F |
| Prime Rib | 15-30 | 10-15°F |
| Pork Butt | 120-240 | 0-10°F |
| Thin Steak | 0-5 | 5°F |
Determining Ideal Rest Minutes
Thickness dictates duration. Thin cuts under 1 inch need mere minutes. Larger roasts demand extended pauses – brisket benefits from 2-4 hours wrapped in towels inside a cooler.
Consider these guidelines:
- Chicken pieces: Serve immediately
- Pork ribs: No rest needed
- Thick chops: 10-15 minute pause
Always verify final internal temperature with a probe thermometer. This ensures safety while maximizing juice retention across all protein types.
Utilizing Foil, Insulation, and Warming Tools
Your choice of kitchen tools impacts juice retention as much as timing. Aluminum foil becomes either an ally or enemy based on application. Master these techniques to lock in heat without sacrificing texture.

Strategic Foil Applications
Loosely tent thicker cuts like beef roasts with foil during short rests. This slows surface cooling while letting steam escape. Use rimmed pans to collect juices for au jus or gravy.
Crispy-skinned poultry requires different handling. Covering roasted chicken traps steam, ruining that golden crunch. Instead, place birds on wire racks to maintain airflow during brief pauses.
“Foil acts like a thermostat – tight wraps cook, loose covers protect,” explains BBQ champion Melissa Cookston.
| Protein | Foil Method | Result |
|---|---|---|
| Brisket | Tight wrap + towels | 4-hour hold |
| Pork shoulder | Loose tent | Juice retention |
| Chicken thighs | No foil | Crispy skin |
For multi-hour holds, insulate tightly wrapped meat with towels in coolers. This maintains safe temperature ranges above 140°F. Always place a folded towel under hot pans to prevent melting plastic liners.
Monitor internal heat with probe thermometers during extended rests. Pull proteins from insulation once they drop below 145°F. This balance keeps dishes warm without overcooking.
Resting Time Strategies for Grilling, Roasting, and Barbecue
Competition pitmasters guard their resting techniques like state secrets. Their award-winning results come from strategic heat management after removing proteins from smokers or grills. This phase transforms tough collagen into silky textures while locking in complex flavors.
Low & Slow Cooking Rest Periods
Smoked brisket reaches peak perfection during extended holds. Top teams wrap meats in foil with broth during final cooking stages, creating steam chambers that soften fibers. Post-smoke, they transfer packages to insulated boxes for 2-4 hours – sometimes longer.
Franklin Barbecue uses commercial warmers to hold briskets at 150°F for 9 hours. Caldwell County BBQ pushes limits with 17-hour holds at 170°F. These controlled environments let juices redistribute evenly without cooling.
| Professional Method | Home Alternative | Hold Duration |
|---|---|---|
| Alto-Shaam warmer | Cooler + towels | 4-6 hours |
| Cambro box | Oven at 170°F | 2-3 hours |
| Steam table | Slow cooker on warm | 1-2 hours |
“The hold is where magic happens – that brisket’s still cooking even when you think it’s done,” says Aaron Franklin of Franklin Barbecue.
For pork shoulders, add apple juice to foil wraps before resting. The acid helps break down connective tissues. Always place meat fat-side up during resting time – gravity pulls rendered fats through leaner sections.
Home cooks can replicate these results:
- Wrap tightly in double foil with 1/4 cup liquid
- Place in empty cooler lined with beach towels
- Monitor internal temp – keep above 140°F
This approach works for ribs, chuck roast, and even whole birds. The longer meat rest periods allow flavors to mature while maintaining food-safe temperatures.
Advanced Tips for Achieving Perfect Texture and Juiciness
Cutting into steak too soon floods your plate with lost flavor. High-heat preparation creates intense pressure within muscle fibers, forcing juices toward cooler areas. Letting meat rest cooking principles work reverses this flow naturally.
Thicker cuts demand precise timing. A 1.5-inch ribeye gains up to 13°F internally during pauses – pull it 10°F below target doneness. Use residual heat to finish cooking while preserving moisture.
Surface temperature matters more than clock time. Touch-test your steak: springy flesh signals incomplete redistribution. Wait until firmness relaxes slightly – usually 8-12 minutes for medium-rare. This ensures even texture from edge to center.
Elevate rested meats on wire racks to prevent sogginess. Catch escaping juices for pan sauces, but never pour hot liquids directly onto sliced cuts. Apply these rest cooking techniques, and every bite delivers concentrated flavor without chewiness.
Great results hinge on patience. Let meat rest undisturbed – even 5 extra minutes transforms dry disappointment into succulent mastery. Your perfect steak awaits through calculated waiting.


