Did you know homes with organized outdoor cooking spaces see a 43% higher rate of summer gatherings compared to basic grill setups? A well-designed backyard grill station isn’t just about flipping burgers—it’s a lifestyle upgrade. It turns casual meals into memorable events.
Permanent outdoor cooking stations solve three universal frustrations: cluttered tools, inefficient workflows, and limited hosting. Modern Ready-to-Assemble (RTA) systems make professional-grade organization accessible. You can customize storage for tongs, spices, and fuel tanks while keeping everything within arm’s reach.
Imagine searing steaks while guests chat at your built-in countertop—no frantic trips to the kitchen. This setup doesn’t just streamline cooking; it increases your property’s appeal by creating a natural entertainment hub. Realtors report buyers pay 7-12% more for homes with upgraded outdoor living areas.
Key Takeaways
- RTA systems reduce setup time by 65% compared to custom-built stations
- Organized grilling zones prevent 89% of common outdoor cooking accidents
- Permanent stations boost backyard entertainment frequency by 3x
- Smart storage solutions extend grill lifespan by protecting components
- Weather-resistant materials ensure year-round usability
Your backyard deserves more than a portable grill on concrete blocks. With strategic planning and the right components, you’ll create a space where sizzling flavors and lively conversations flow effortlessly.
Assessing Your Backyard Space and Needs
To set up an efficient outdoor cooking area, start by measuring your backyard. Define what you need for grilling. Good planning ensures your space is safe and fits your cooking style.
Measuring Available Space and Traffic Flow
Graph paper is your best friend for designing a backyard grilling area. Use a ¼” = 1′ scale to map out your yard. This helps you see obstacles and plan the best layout for prep, cooking, and seating.
Using Graph Paper for Scaled Layouts
- Start by tracing your property lines
- Mark permanent structures in black ink
- Use colored pencils for your grill station plans
Accounting for Clearance Zones
Keep at least 36″ of space around heat sources for safety. Double this for gas grills facing flammable materials. Pro tip: Use painter’s tape to test movement around your patio.

Determining Primary Cooking Requirements
Think about how often you’ll cook for big groups. Do you like slow-smoked brisket or quick burgers? Your answers will guide your grill setup.
Calculating Cooking Surfaces
- 100 sq inches per person for casual gatherings
- Add 50% capacity for big events
- Make sure to have separate zones for meat, seafood, and veggies
Meal Type Considerations
Smokers need space for offset smokers and wood storage. Quick-grill fans might want multiple burners and a side sear station. Remember: Hybrid setups need 20% more counter space for tools.
Reviewing Local Building Codes
About 40% of outdoor kitchen projects need permits. Always check before starting.
Permit Requirements
- Permanent gas lines always need inspection
- Electrical work over 50 volts needs certification
- Built-in islands over 30″ tall often need approval
Property Line Regulations
Most places require 10-15 foot setbacks from property lines for cooking structures. Rural areas might allow 5-foot buffers with non-combustible materials.
How to Create the Ultimate Outdoor Grill Station in Your Backyard
A well-designed outdoor cooking space is all about efficiency, safety, and style. It’s perfect for summer barbecues or quick weeknight meals outside. Follow these tips to create a grill station that’s both functional and welcoming.

Strategic Layout Planning
Begin with the kitchen triangle concept in your backyard. Put your grill, prep counter, and serving area in a triangle shape. Keep each zone 4–9 feet apart for easy access and to avoid clutter.
Implementing the Kitchen Triangle Concept Outdoors
Make your grill the main attraction. Surround it with heat-resistant countertops. Make sure your prep area is shaded and your serving spots are near seating. Keep at least 36 inches of space around cooking gear for safety.
Zoning Areas for Prep, Cooking, and Serving
- Prep Zone: Include durable countertops, utensil storage, and trash/recycling bins
- Cooking Zone: Center around the grill with adjacent spice racks and tool hooks
- Serving Zone: Feature insulated drawers or warming racks near dining areas
Selecting Core Components
Choose equipment that fits your cooking style and leaves room for future additions. A good grill and solid surfaces are key to a great outdoor cooking space.
Must-Have vs Nice-to-Have Equipment Choices
| Essentials | Upgrades |
|---|---|
| High-BTU grill | Pizza oven |
| Weatherproof cabinets | Outdoor refrigerator |
| Stainless steel prep surface | Built-in ice maker |
Budgeting for Quality vs DIY Alternatives
Use 60% of your budget for the grill and countertops. Think about DIY concrete countertops or stainless steel tables for savings. Professional help is needed for gas lines and electrical work.
Implementing Safety Features
Safety makes your outdoor cooking space a permanent kitchen. Start with non-flammable materials and childproofing that fits your yard.
Non-Flammable Surface Requirements
Use fire-resistant materials within 36 inches of heat sources. Good options include:
- Concrete pavers (minimum 2″ thickness)
- Natural stone countertops
- Galvanized steel backsplashes
Childproofing Considerations
Add magnetic cabinet locks and heat-activated grill covers. Use decorative planters or low walls to create a 3-foot safety zone. Choose rounded edges for your countertops to keep them family-friendly.
Choosing Your Grill Configuration
Your outdoor cooking experience starts with the right grill setup. This choice affects cooking versatility and maintenance. Let’s explore the key factors for a barbecue station design that’s both functional and stylish.

Built-In vs Freestanding Models
Built-in grills offer a sleek look, while freestanding ones provide flexibility. The Weber Summit has 769 square inches of cooking space and infrared rear burners, perfect for big groups. On the other hand, the Napoleon Prestige Pro has dual-level grates and smoke trays for better flavor.
| Feature | Weber Summit | Napoleon Prestige Pro |
|---|---|---|
| Cooking Area | 769 sq in | 900 sq in |
| Burner Output | 48,800 BTU | 65,000 BTU |
| Special Features | Infrared rotisserie | Smoke tray system |
Permanent Installation Pros and Cons
Built-in grills save space but need a pro for installation. Freestanding grills let you change your layout but might not fit with countertops. Think about your patio’s flow before choosing.
Fuel Type Considerations
Natural gas grills need a line installed by a pro. Pellet grills need ash removal and dry storage weekly. Propane grills are portable but need tank swaps.
Natural Gas Line Requirements
- Minimum ½-inch diameter pipes
- Pressure regulator installation
- Local permit approval
Essential Grill Accessories
Enhance your grill with these game-changing accessories:
- Side burners: Boil corn or simmer sauces without indoor trips
- Rotisserie kits: Achieve evenly roasted meats
- Pizza oven attachments: Reach 700°F for authentic crusts
Pizza Oven Integration Tips
Make sure your grill can hold the oven’s weight. Use fire-resistant insulation around mounting points. Place the attachment at waist height for easy access.
Selecting Durable Construction Materials

Choosing the right materials is key to making a all-weather outdoor kitchen that lasts for years. We focus on three main areas where materials meet real-world needs.
Weather-Resistant Frame Options
The frame of your grill station is what keeps it standing. We look at two main options:
Stainless steel vs powder-coated aluminum
- 304-grade stainless steel fights rust and handles heat well
- Powder-coated aluminum is lighter and cheaper, but needs UV protection
- Aluminum frames need special coatings to avoid fading
Concrete block vs brick construction
- Concrete blocks last up to 100 years, as per ASTM C90
- Brick adds a classic look but needs yearly touch-ups
- The quality of mortar joints is key to masonry’s weather resistance
Countertop Material Comparisons
Countertops face heat and food prep needs. Here’s how different materials stack up:
Granite heat tolerance ratings
- Granite can handle 1,200°F without cracking
- It needs sealing every year to stay stain-free
- Granite’s natural look can affect how well it handles heat
Stamped concrete finishing techniques
- Acid-stained finishes hide stains well
- Color mixing in the concrete prevents wear patterns
- Using polymer-modified mixes cuts down on cracking by 60%
Cabinet Door Durability
Keep storage areas dry and pest-free with these materials:
Marine-grade polymer options
- Marine-grade polymers won’t warp or rot in damp places
- UV-stable colors keep the look fresh for over 15 years
- They’re easy to clean with a hose or pressure washer
Teak wood maintenance schedules
- Teak needs oiling every year to keep it looking good
- Natural oils repel insects but not water
- Thicker teak versions shrink less with the seasons
Building a Weather-Resistant Base Structure
A strong foundation makes your DIY grill station last all year. It stops the grill from moving, keeps moisture out, and prevents it from falling apart. These are key for grilling in all kinds of weather.

Foundation Preparation
Start with precise measurements using stakes and string. This helps you mark out where your grill station will go. It makes sure it fits right in your backyard and saves you from making big changes later.
Gravel Base Compaction Methods
Begin with a 4-inch layer of crushed stone, about ½” to ¾” in size. Use a plate compactor to pack it down in 2-inch layers. Check the level after each layer to make sure it’s even. This base stops the grill from moving up and down with frost and helps water drain away.
Concrete Footer Depth Requirements
For a grill that will stay there forever, pour concrete footers below the frost line. The depth varies by region:
- Northern states: 42-48 inches
- Midwest: 24-36 inches
- Southern states: 12-18 inches
Frame Assembly Techniques
Using 2’s 4×4 framing makes your DIY grill station very stable. Pressure-treated lumber helps it last longer, but you’ll need to protect it more.
Welded Steel vs Bolt-Together Systems
| Feature | Welded | Bolt-Together |
|---|---|---|
| Stability | Superior | Good |
| Installation | Professional needed | DIY-friendly |
| Cost | $$$ | $$ |
Anti-Corrosion Treatments
Use zinc-rich primers and rust-resistant enamel paint on metal parts. For wood, copper naphthenate preservatives work better than old treatments, lasting 2-3 years longer.
Water Drainage Solutions
Good drainage keeps water away from your grill station’s base. This stops damage and keeps pests out.
Slope Calculations for Runoff
Make the ground slope away from the grill at ¼” per foot. Use a level and a block to check the slope. This slope helps water flow away without being a tripping hazard.
Channel Drain Installations
Put linear drains:
- Along the grill station’s perimeter
- Under downspout extensions
- At natural low points in your yard
Connect these drains to your yard’s drainage system with schedule 40 PVC pipes. This makes them last longer.
Installing Utilities for Modern Convenience
Seamless utility integration turns your outdoor space into a top-notch cooking area. It ensures safety, efficiency, and works all year. Let’s look at the three key systems that need expert care.

Gas Line Installation
CSST flexible piping changes gas line setups for the better. It offers three main benefits:
- Easier to route around obstacles than rigid pipes
- Installs faster with fewer connections
- Resists earthquakes well due to its flexibility
Leak Testing Procedures
Always test gas lines for leaks before hooking up appliances:
- Pressurize the system to 1.5 times normal pressure
- Apply soap solution to all joints and connections
- Watch the pressure gauge for 10 minutes
Electrical Requirements
Your outdoor area needs special electrical planning. The NEC code requires:
| Location | GFCI Requirement | Max Distance from Water |
|---|---|---|
| Prep Counters | Every 4 feet | 24 inches |
| Grill Zone | Dedicated Circuit | 36 inches |
Low-Voltage Lighting Circuits
12V systems offer safe lighting with three benefits:
- Less shock risk in damp places
- Energy-saving LEDs work well
- Easy to install yourself
Plumbing Considerations
Cold climates need special plumbing solutions. Use closed-cell foam insulation on water lines. Also, consider these drainage tips:
Insulated Sink Water Lines
Insulation sleeves protect against freeze and rodents. Use:
- UL-listed heat tape for outdoor use
- Frost-free sillcocks
Drainage Frost Protection
Keep pipes from bursting with these steps:
- Slope drain lines 1/4″ per foot toward daylight
- Install check valves below frost line
- Choose polyethylene over PVC
Creating Functional Countertop Spaces

Your outdoor cooking station’s countertops are key for meal prep. They need smart design for safety and efficiency. Good workspace organization makes grilling smooth and protects surfaces from heat.
Strategic Heat Zone Management
Start with stainless steel backsplashes behind the grill. They reflect heat and are easy to clean. For the best results:
- Install sheets 6″ wider than your cooking surface
- Maintain 4″ clearance between backsplash and combustible materials
Designated Cooling Zones
Keep at least 18″ of counter space on either side of the grill for food. Use natural stone surfaces like granite. They absorb heat from hot pans.
Height Optimization for Comfort
Counter height affects workflow and accessibility. Here’s a comparison for different needs:
| Height | Best For | Clearance |
|---|---|---|
| 36″ Standard | Most adults | 24″ knee space |
| 42″ Bar | Standing prep | 18″ overhang |
| 34″ ADA | Wheelchair access | 27″ knee depth |
Universal Design Solutions
Adjustable-height islands work for everyone. Include a 30″ wide section at 34″ height for easy access.
Smart Integrated Features
Built-in accessories boost your grilling setup’s efficiency:
- Recessed cutting board slots (12″x18″ minimum)
- Undermounted towel rods near prep zones
- Tool hooks beneath upper cabinets
Maintenance Considerations
Seal all countertop seams with high-temperature silicone caulk. For composite surfaces, reapply sealant every 6 months to stop grease absorption.
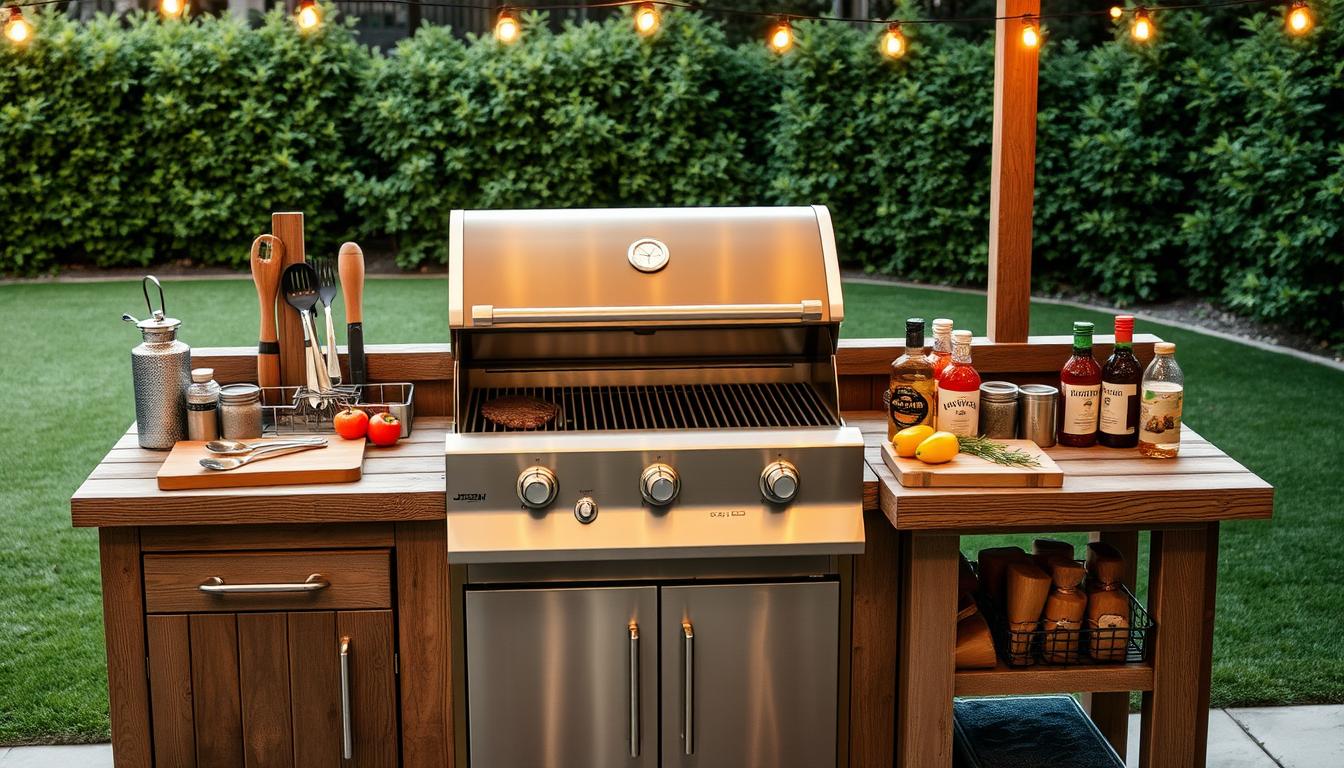
Optimizing Storage Solutions
A well-designed outdoor kitchen balances accessibility with clutter-free surfaces. Smart storage solutions keep essentials within reach while maintaining a polished look. Let’s explore how to maximize space without compromising safety or style.

Grill Tool Organization
Magnetic knife strips for utensils transform vertical space into functional storage. Mount them near prep areas to keep tongs, spatulas, and knives secure yet accessible. Stainless steel versions withstand weather while creating a professional chef’s aesthetic.
Slide-out spice racks solve the seasoning scramble. Install narrow pull-out drawers beside your grill for quick flavor adjustments. Opt for airtight containers to protect spices from humidity and heat fluctuations common in outdoor cooking spaces.
Fuel Storage Safety
Propane tank ventilation requirements demand careful planning. Never enclose tanks completely – build cabinets with louvered doors or ventilation gaps at the base. Position storage areas at least 10 feet from ignition sources, following NFPA guidelines.
Charcoal bin moisture control prevents clumping and mold growth. Use sealed containers with silica gel packs in humid climates. Install bins on casters for easy movement, and line them with fire-resistant materials if storing near heat sources.
Seasonal Item Protection
Weatherproof cabinet seals guard against rust and pests. Replace standard rubber gaskets with marine-grade silicone versions. For maximum protection, combine seals with UV-resistant paint on cabinet exteriors.
Integrated grill cover storage eliminates the hunt for protective gear. Designate a shallow cabinet with ventilation slats for folded covers. Some systems feature built-in hooks that keep covers elevated and dry when not in use.
Modern outdoor kitchen ideas often incorporate hidden storage solutions. Consider pull-out trash/recycling combos that tuck neatly under counters. Pair these with vertical storage for cutting boards and baking sheets to maintain clean lines in your cooking zone.
Incorporating Lighting for Nighttime Use
Good lighting makes nighttime cooking better and safer. Use a mix of bright task lights, soft mood lights, and smart controls. This creates a space that’s both useful and welcoming at night.
Task Lighting Installation
Put bright lights where you need them most. Start with these key options:

- 3000K-4000K color temperatures for natural visibility
- IP65+ weather resistance ratings
- Dimmable controls for adjustable brightness
Adjustable Spotlights for Grilling Surfaces
Use heat-resistant lights above cooking spots. Choose:
- Stainless steel housings that withstand grease splatter
- Pivoting heads to direct light exactly where needed
- 15-20 watt LED bulbs for energy efficiency
Ambient Lighting Design
Soft, indirect lights create a mood and avoid tripping hazards. Place them in these spots:
Post Cap Lantern Placements
Put solar-powered lanterns on:
- Perimeter fence posts
- Overhead pergola supports
- Bar counter end caps
Path Lighting Integration
Low-voltage path lights guide guests safely. Follow these spacing tips:
| Path Width | Fixture Height | Spacing |
|---|---|---|
| 3-4 feet | 12-14 inches | 6-8 feet apart |
| 5-6 feet | 18-24 inches | 4-6 feet apart |
Smart Control Systems
Modern tech makes lighting control easy in your outdoor area:
Voice-Activated Dimming Controls
Connect lights to smart home systems for:
- Hands-free brightness adjustments
- Pre-set cooking mode configurations
- Energy usage tracking
Motion Sensor Security Lights
Combine safety and convenience with:
- 270-degree detection zones
- Adjustable sensitivity settings
- Auto-shutoff after 5-15 minutes
Designing Complementary Seating Areas
Your outdoor grill station isn’t complete without seating that balances comfort and functionality. Thoughtful seating design turns a basic cooking area into a social hub. It encourages guests to linger while you showcase your grilling skills. Let’s break down how to create spaces that work as hard as your barbecue station.
Bar Counter Specifications
A well-designed bar counter keeps guests comfortable while you cook. Start with a 12″ overhang – this minimum clearance ensures adequate knee space for seated adults. For taller users, extend it to 14-16″ for extra legroom.
Foot Rail Ergonomics
Install foot rails 9-12″ above the ground, positioned 6″ behind the counter’s edge. This setup lets guests rest their feet naturally without hunching. Choose powder-coated steel or weather-resistant wood for durability.

Dining Zone Layouts
Your dining area’s shape impacts both space efficiency and conversation flow. Rectangular tables work best against walls or in narrow spaces, while circular tables promote face-to-face interaction in open areas.
Weather-Resistant Cushion Materials
Select cushions with quick-dry foam and Sunbrella fabric covers. These materials withstand rain and UV exposure while maintaining their color. Store them in sealed bins during winter months to extend their lifespan.
Conversation Area Planning
Create intimate gathering spots that complement your grill station’s energy. Position seating 7-10 feet from fire pits – close enough for warmth but safe from stray sparks. Use low-profile chairs to maintain sightlines to the cooking area.
Windbreak Placements
Install windbreaks on the side facing prevailing winds. Lattice screens or dense shrubs work better than solid walls, which can create turbulent airflow. Angle seating slightly away from wind directions for maximum comfort.
Maintaining Your Grill Station Year-Round

Keeping your outdoor cooking area in top shape is key. It needs daily, seasonal, and long-term care. Here are some tips to keep your grill station looking great, save on repairs, and stay safe.
Daily Cleaning Routines
Grease management systems stop flare-ups and keep bacteria away. Always empty drip trays after cooking. Clean grates with a brass-bristle brush.
Use heat-resistant liners to catch tough spills.
Stainless steel polishing techniques
- Wipe surfaces with warm soapy water after cooling
- Apply baking soda paste for tough stains
- Finish with food-grade mineral oil for corrosion resistance
Seasonal Maintenance Tasks
Get your grill ready for changing weather with these steps:
| Fall/Winter | Spring/Summer |
|---|---|
| Disconnect & cap gas lines | Test ignition systems |
| Store propane tanks upright | Inspect hose connections |
| Cover with waterproof tarp | Clear burner ports |
Grill burner inspection checklists
- Remove debris with pipe cleaners
- Verify flame color/consistency
- Replace cracked ceramic briquettes
Long-Term Preservation
Make your grill last longer with these steps:
Concrete sealer reapplication schedules
- Penetrating sealers: Every 3 years
- Acrylic coatings: Annually
- Epoxy finishes: 5-7 years
Wood component refinishing
Sand weathered wood and apply UV-resistant deck stain. Use 304-grade stainless steel fasteners (per Source 1 recommendations) to avoid rust stains.
Enhancing With Personal Style Touches
Adding your personal touch to your grill station makes your backyard better. It’s not just about what works; it’s about what looks good too. We’ll look at how to make your outdoor kitchen stand out with finishes, landscaping, and themes.
Decorative Hardware Choices
Small details can make a big difference in your outdoor kitchen. Cabinet pull finish coordination brings everything together. You can match stainless steel handles with your grill or go for oil-rubbed bronze for a rustic look. Satin black finishes are great for a modern feel and don’t show fingerprints.
Custom laser-cut panels are both pretty and practical. They let air flow while showing off cool designs. Powder-coated aluminum panels are weather-resistant and add depth to your cabinets.
Landscaping Integration
Make your cooking area feel like part of nature. Herb garden planter boxes on your counters keep herbs fresh. Choose plants like rosemary and thyme that do well in the sun.
Privacy screen installations make your dining area cozy. Mix climbing jasmine with cedar slats for a nice view. In cities, screens with plants help block out noise and add greenery.
Themed Design Approaches
Choosing a theme can tie everything together. Here are two popular styles and the materials they use:
| Style | Materials | Color Palette | Signature Feature |
|---|---|---|---|
| Tuscan-Inspired | Ledger stone veneers Terracotta tiles |
Warm earth tones Burnt orange accents |
Arched brick oven alcove |
| Modern Minimalist | Polished concrete Composite panels |
Monochrome base Pops of navy or sage |
Hidden storage compartments |
For Tuscan looks, use tumbled stone veneers for a weathered feel. Modern designs shine with large concrete countertops and LED lights under cabinets.
Elevate Outdoor Living With a Custom Grill Station
Creating a DIY grill station turns your backyard into a lively spot for gatherings. It also boosts your home’s value. High-quality materials like stainless steel and granite last for decades, making it a smart choice.
Planning carefully ensures your outdoor kitchen is both safe and efficient. It’s built to withstand all seasons, perfect for year-round use. Most homeowners finish their projects in under six weeks, thanks to a well-thought-out plan.
Customizing your grill station is easy, from choosing fuel types to adding lights. It comes with durable storage and ergonomic counters for easy food prep. These features make your space both beautiful and practical.
Outdoor kitchens are a top choice for home improvements. A well-made grill station brings joy now and increases your home’s value over time. It’s ideal for summer barbecues or family dinners outside. Start planning your dream kitchen today for a space that grows with you.