While squeezing a lemon to bring out the flavor in your favorite dish and give it a fresh, tangy punch, have you ever been disappointed because the lime is a little too dry to yield any juice at all?
Most of us probably end up throwing that useless piece right away!
However, an experienced home cook would suggest microwaving the lemon for 20 seconds, which is just enough time to get it all plump and ready to squeeze all the leftover juices quite easily.
Whether you are an amateur cook or a professional chef, you will face lots of cooking troubles like this one to keep you entertained in the kitchen all the time!
Keep calm, my friend!

For we got you covered with our 101+ Best Cooking Tips that will save your time, allow you to cut corners while using substitutes and even help salvage almost-ruined dishes by turning them into deliciously cooked meals that are guaranteed to earn a compliment or two along the way!
Without any further ado, let’s get started.
101+ Cooking Tips and Tricks for Beginners
Food Preparation Tips
- Tuck In Your Fingers!
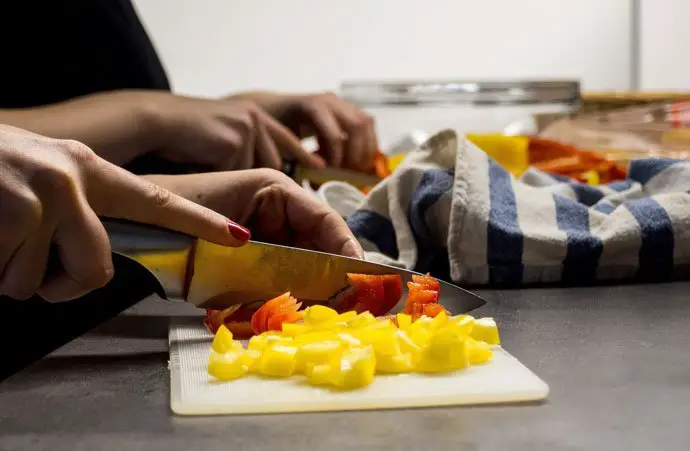 While cutting/peeling vegetables or meat with a sharp knife, always remember to keep your fingers safely away and use your upper knuckles to have better control of what you are doing. Chefs Knives
- Cut Veggies Faster
It’s so easy to lose track of time while prepping your veggies. However, you can cut down the time by half if you purchase a Mandolin, which can be used to slice, make waffle and crinkle cuts, julienne slices out of cheese, veggies, fruits and a huge variety of other items as well! Mandolin
- Tear-Free Onion Slicing

We hate to see you cry while cutting onions! The best way to avoid tearing up is to keep the onion in a freezer 10 minutes before you need to cook to minimize the overwhelming sensation. Freezer Chest
- Mise En place
That’s French for “Put in place”! Make sure every ingredient is peeled, chopped, measured and put in respective containers before starting to cook. That way, you will be able to save time and have fewer mistakes while working at the same time. Set of Bowls
- Let the Meat Chill

One of the basic cookery skills includes learning how to make soft and juicy meat for dinner! And the best way to do that is to let the meat sit at room temperature so that it has enough time to rest for a while before cooking. Bamboo cutting board
- Say Cheese!

Tired of getting big chunks of cheese while wrestling with the grater fruitlessly? Well, it’s time for a change! Instead of trying to slice soft cheese, put it in a freezer for 20-30 minutes and then grate the now-hardened cheese easily. Cheese Sampler
- Stay Sharp 24/7

A knife with blunt edges is a recipe for disaster! That’s why the experts recommend honing the knives before you start to cook every day. You can also use a whetstone, diamond or a Knife Sharpening Rod.
Recommended Reading: 101+ Kitchen Essentials
Cooking Tips for Beginners
- Butter VS Oil?
No matter what type of recipe you are trying to follow NEVER put butter in a heated pan. Doing so will either cause the butter to get burnt or worse, might even catch on fire! It’s best to use vegetable/peanut oil in this type of situation. Peanut Oil
- Don’t Forget to Taste!
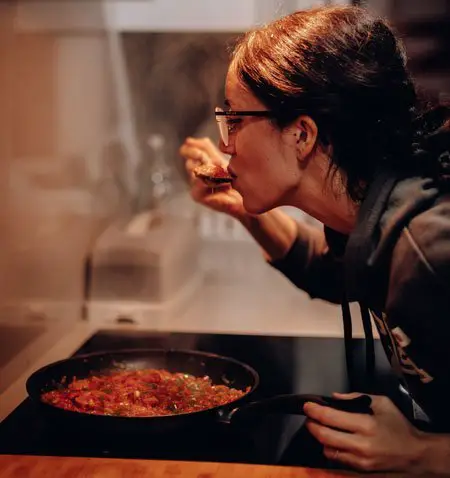
You can always add more seasonings as you go, but you can’t take it back once it’s done! That’s why it’s best to add salt/sugar during different stages of your cooking and taste each time to make sure it’s just enough to bring the flavor. Spice rack
- Mix Till It’s Just Right
Does seeing lumps in the pancake batter irk you a lot? Me too! However, one of the basic pancake cooking tips that I can give you is NOT to over mix the batter by any cost! Stop whisking immediately once the flour is properly mixed. Whisks
- Prevent Oxidization
Some fruits and veggies turn brown if they are left out in the open for too long as a result of oxidization. In this scenario, it’s best to store these types of ingredients in cold water to prevent this from happening. Fruit and veggie storage
- Trust Your Instinct
Cooking 101: trust your instincts more than anything else! Instead of blindly following a recipe’s timing, it’s better to use your own sense of smell, touch, and taste to determine if your dish is cooked properly. Kitchen timer
- Cook Smarter With Alternatives
No buttermilk in the storage? Don’t wait for it to become available again! You can easily substitute buttermilk with regular milk with a pinch of lemon juice in it. Powdered buttermilk
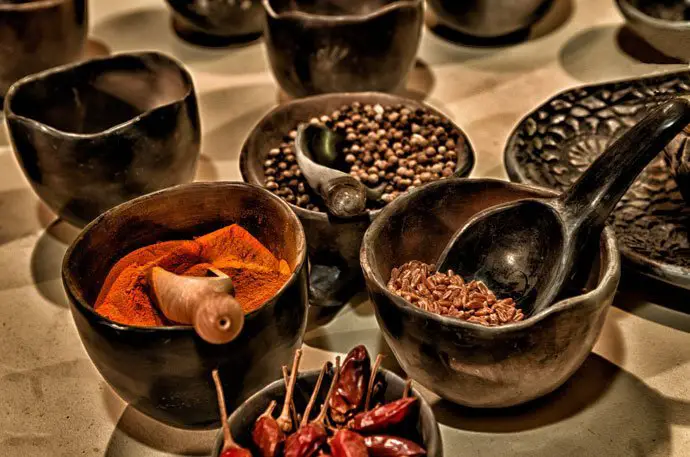
- A Rookie Mistake
We tend to keep all the spices near to our cooking space, right? Well, that’s a rookie mistake to do! The heat and humidity from the kitchen are enough to make the herb and spices lose all their flavor. Place the spices in a container and store that in a cool, dry place for the best result. Spice rack
- Stick to Your Budget
It’s more cost-effective to purchase a whole chicken from the super-shop rather than buying each piece individually. Also, if you roast/cook the whole chicken in one session, it will taste finger-licking good for sure as it’s cooked for a longer time! Roasting pan
Simple Cooking Tips
- Control Pan Crowd
Although it’s tempting to overcrowd a small pan with meat or vegetables, it’s actually the worst thing that you can do to an otherwise good dish! Instead of getting browned/cooked, the items in the pan will end up being soggy and not-so-tasteful. So, choose your pan-size according to the dish. Frying pans
- Salt Fixes Everything!

Food tasting a little bland? Toss a pinch of salt in it and taste again! Salt is the magical weapon when it comes to rescuing fried meats, salads, chocolate, caramels and just about everything else except drinking water! Celtic Sea salt
- Say No to Bubbles
Boil marks on the stovetop is kind of an eyesore, don’t you think? Well, one way you can avoid it is by putting a dry, wooden spoon across the pot that will help break the bubble and send them straight back into the pot without overflowing on your stovetop. Wooden spoons
- Cook Once, Eat Twice
Nowadays it’s hard to find time for cooking, to be honest! That’s why when you do find the time, I would suggest making a large batch of everything and store it for later use. For instance, while stir-frying veggies, save some in the refrigerator and use it later on salads, pizzas etc. in short notice! Tupperware storage containers
- Timing is Everything
Did you know burnt garlic alone is enough to turn the most delicious piece of meat into a bitter, inedible one? That’s how powerful it is! If you want to avoid a disaster like this, learn to add the garlic at the right time and not over-toast it by any means. Garlic
- Good Morning!
Who doesn’t like to have an extra-fluffy scrambled egg in the morning? To kick-start your mornings on a positive note, we suggest adding a bit of warm milk to the egg mixture before you pour it in the pan and get the extra fluff you have been looking for! Egg Scrambler
Overcooked Tips
- Hot Pancakes, Anyone?
Pardon me if I am wrong, but, overcooked, mushy rice grains can’t be salvaged! Having said that, you don’t have to throw it away either. Instead, you can heat up a pan, sauté some vegetables, throw mozzarella cheese, toss in the mushy rice into the mixture and enjoy the now-cooked delicious rice pancakes! Brown Rice
- Ice-Bath to Rescue
This tip is only applicable when you are boiling vegetables. If you happen to go past the boiling point by a little bit, run the veggies in ice-cold water immediately to stop the cooking process in its tracks. In a few minutes, they will start to firm back up little by little. Use glass bowls to do that.
- Make Salad Toppers
Whether you have overcooked a chicken roast or beef steak, it can easily be salvaged by removing the burnt edges and shredding the meat into fine pieces. Add some mayonnaise, sautéed mushrooms and green beans to the meat, season it with salt and you got yourself a YUMMY salad topping ready to be devoured! Meat Shredder
- Re-Crisp the Noodles
Instead of giving you some basic pasta cooking tips, we plan on preparing you for the worst outcome, which is what to do if your noodles get burnt! The best idea would be to sauté them in a pan with olive oil on low flame and throw in some chunks of mozzarella to hide the burnt flavor. E.V.O.O.
- No Poking With Chopsticks
It’s too hard to resist the temptation to poke around brownies with a chopstick to test whether they’re baked yet! However, doing so will only reveal a chocolate-coated stick as brownies are always a little gooey in the middle. To prevent it from over baking, check to see if the edges are pulling away from the pan a bit. Chopsticks
- Buttery Fish Sauce

Has butter gone wrong and burnt badly? Don’t worry, you can still make it work! Just squeeze a piece of lemon, toss in some coarsely chopped fresh parsley, and add a tablespoon of chives and make the perfect fish sauce to go with your dinner! George Forman Grill
Cooking Tips for Kids
- Pick the Recipe

Engaging your toddlers in the kitchen will develop their motor skills, eye-hand coordination as well as help you raise an adventurous eater along the way! To gain their attention, it’s better to let them pick their favorite recipe by flipping through a cookbook or show pictures from a blog so they know what to expect in the end. Children’s Cookbook
- Use Colorful Accessories

As we all know children LOVE bright block colors on all things! That’s why we suggest using colorful kitchen accessories like a cute apron in the little chef’s size, heart, star or moon-shaped cookie cutters or spatulas in bright colors to get the kids inside your kitchen all the time! Children’s Kitchen Apron
- Sniff, Lick, And Taste!
Licking the beaters just after you’ve whipped up some cream or yogurt often tastes YUMMIER than the desert itself! Don’t deprive your kids of that fun part! Let them taste all the edible ingredients one by one and they will be able to learn all about cooking through real-life experience. Electric Mixer
- Keep Them Active
Food tastes even more delicious when your kids help make it. Want proof? Sauté some asparagus in a pan with olive oil and ask the young chef to season it with some butter and parmesan in the end. Your kid is more likely to eat the veggies they prepared all by themselves! Children’s Cookbook
- Start Small
Hey! Nobody is asking a 6-year old to cook a 3-course dinner tonight! Rather, it’s important that you start with a small task to hold their attention for a longer time. For instance, you can just ask them to wash the vegetables, cut mushrooms with a butter knife or do other tasks that are suitable for their age. Children’s Starter Knives
- Adapt As You Go
The little munchkins might even turn out to be your best assistance in the kitchen if you train them the right way! Once they begin to grasp the basic ideas, you can teach them how to roll the dough out, beat eggs, stir cake batter or even grate cheese and sprinkle them on top of macaroni! Rolling Pin
- Make Them Smile
Remember, these moments are precious! So, allow the children to make their own mistakes and learn from them along the way. Let your kids have fun while they cook and don’t forget to take a picture of the little chef’s action in the kitchen as well! Digital Camera
Seasoning Tips for Enhanced Flavor
- Know the Difference
I love recipes that tell me what to cook with what I have in my pantry! However, using substitutes don’t always bring the best result! For example, if the recipe asks you to use finely ground pepper, you MUST add exactly that as coarse ground pepper doesn’t have that same level of sharpness in them. Pepper Grinder
- Be More Like “Salt-Bae”
When it comes to seasoning, let “Salt” and “Pepper” do their magic to get a flavorful dish in the end! We suggest seasoning food with these ingredients from high up so that they can get evenly distributed and you look COOL like the “Salt Bae” at the same time! Celtic Sea salt
- Toast Your Way In
Before you grind your spice, there’s a clever hack for bringing more aroma to your spices and that’s called “TOASTING”! Just toss the spices into the pan, heat them up for a few minutes, swirl and as soon as you start to smell them, turn the stove off as they are ready to be used! Spice/Coffee Grinder
- Adjust Accordingly
Is food tasting too salty? Add vinegar, unsalted tomatoes or maple syrup to balance it out! If it’s too spicy and making your eyes water as you eat, then sweeten it up with sour cream, cheese or olive oil. And in case you got it over-sweetened in the process, salvage it with fresh herbs and dash of cayenne easily! Apple Cider Vinegar
- Dried Herbs Go First

Dried herbs need a little bit of time to come back to life and that’s why it’s recommended to add them in the very beginning. You can let them simmer in a slow-cooked sauce or add while braising meat and they will burst with flavor in the end! Fresh Dried Herbs
- DON’T Forget the Lemon

Just like salt, acid helps take your food to a whole new level in an instant! Whether you are stir-frying vegetables or making a homemade grilled chicken, adding a dash of citrus juice will amp up the flavor for sure! Fresh Kaffir Limes
- A Little Bit More
Finished cooking and ready to serve? Wait, there’s a little bit more to do! Sometimes, last-minute ingredients are all you need to make your dishes burst fully into flavor and taste AWESOME! Minced garlic and fresh herbs are an excellent way to season lasagnas for instance! Garlic Press
Pressure Cooking Tips
- Less Is More
When it comes to pressure cooking advice, you must remember the golden rule of never filling the pot with more than halfway with liquid. The logic behind this rule lies in the special mechanism of pressure cooker which doesn’t operate efficiently if you fill it with more liquids than recommended. Pressure Cooker
- Cut Even Pieces
You wouldn’t want one piece of chicken undercooked and the other a bit overcooked, would you? Well, the trick to ensure this type of disaster doesn’t take place is to cut all food into uniform-sized pieces so that they all get to enjoy being cooked for the same amount of time! Chefs Knives
- Thicken Sauces Later
Not going to lie, it’s going to be tough to thicken any kinds of sauces inside a pressure cooker! However, you can try keeping the device on top of the stove once the cooking part is done, remove the lid and add cornstarch to the mixture to help along the process. Pressure Cooker
- Go for Chicken Thighs
Chicken thighs are packed with flavor and can be cooked in pressure cooker pretty easily. A little tip: don’t fret over cutting all the fats away! Just cut the meat into small pieces, throw them in the pressure cooker and the leftover fat will melt away automatically while it’s cooking! Pressure Cooker Cookbook
- Rinse the Rice

A lot of people ask me about rice cooking tips to make them non-sticky. Well, the easiest way to achieve your desired result is to rinse the rice in hot water until the flowing water turns clear! Then, cook it in the pressure cooker and get ready for a perfect, hot plate of rice to eat! Bulk Rice
- Stop Guessing
It’s hard to guess if the middle of the cheesecake is perfectly cooked in a pressure cooker, right? Well, then stop guessing! Use an instant-read thermometer to determine that easily! If the temperature shows 150-Degree Fahrenheit or more in the center, know that the cheesecake is ready to get served! Instant-read thermometer
Camping Cooking Tips
- Freeze Your Meat

If you are camping for several nights in a row, then chances are, you are going to need more than one batch of meat. The best way to keep meat from going bad is to freeze it beforehand and store it in a cooler for later use. Freezer Chest
- Under The Wrap
Want your food to stay warm for the longest time? Aluminum foil wrapper works best in this situation! Make sure to keep a generous amount of foil paper in hand while you pack for your trip. Aluminum foil
- Prep and Prep!
If you want to enjoy your travel time to the fullest, then it’s a good idea to prep your cooking items as much as possible from home. For example, you can chop up veggies and meat in bite-sized pieces and pack them in Ziplock bags for quicker meal preparation. Ziplock Bags
- Get Creative
You don’t need a lot of ingredients to cook for your camping trip! So, instead of full-sized containers, we suggest you get a little bit innovative and use small things like Tic-Tac boxes for storing salt/spice/pepper. Tic-Tacs
- Keep It Light
You are going for camping, not moving across the country, right? Well, then, there’s no reason travel heavy, is there? Instead of an entire cookware set, only select one or two things like a skillet or crockpot that’s able to cook the most general items. Crockpot
- Bring Snacks
Yes, we all know how excited you are to show off your cooking skills to others! But let’s not forget, you might get hungry while cooking! That’s why, it’s best to pack light snacks like muffin, cupcakes, bagels or fresh fruit with you. Single Serve Snacks
- Omelets and More

On the very last day of your trip, you might find a bunch of leftover items like veggies, meat in your camp. Instead of throwing them away or carrying back home, use all the ingredients to make a big, FAT, yummy omelet for breakfast! Omelet Maker
Culinary Tips
- Get Extra-Crispy Skin
Fish and meat always seem to taste a lot better with an extra-crisp outer skin! If you want to get that crispy feeling, then pat the raw items dry with a paper towel and get rid of the excess moisture as much as possible. Paper Towels
- Chop Veggies Diagonally
Veggies do look really fancy when they are cut in a different way! However, there’s a hidden benefit to it as well! It helps cook all the ingredients quickly, distribute the heat evenly and absorb sauce and seasoning from all sides. Chefs Knives
- Make a Clean Cut
Do you struggle while cutting your birthday cake just like me? Well, I’ve got a hack for you! Run your knife under warm water and dry it off. Now you can make a clean a cut out of any desserts including Cheesecake, no matter how sticky it is! Cheesecake Recipes
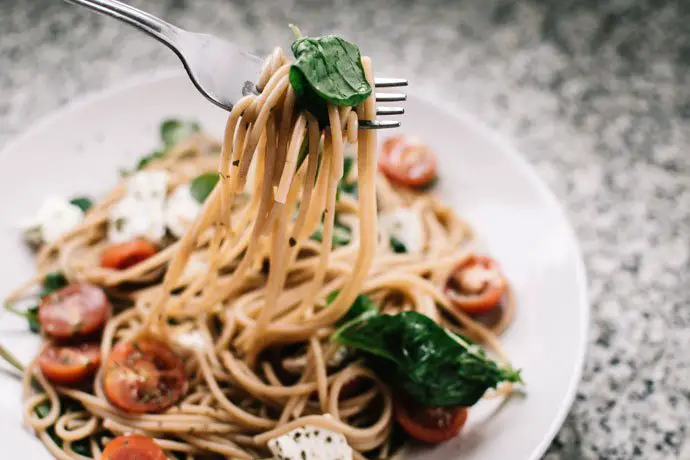
- Get That Silky Finish
If your pasta dish or pizza seems missing that extra jazz you’ve been looking for, then a dollop of the extra-virgin olive oil might do the trick! From salad dressings to meat seasonings, olive oil is enough to bring in a little drama to the table! E.V.O.O.
- No Place for Odors!
Garlic peeling is quite a relaxing job to do if you minus the odor. However, once you touch a garlic clove, it CAN’T be undone! To keep your hands free from odor, place the cloves in between two bowls and shake vigorously until they are free of their shells. Garlic Peeler
- Choose Alternate Dressing
Among all the tofu cooking tips, the best one that I have found asks you to skip the oil while marinating the tofu cubes! These small pieces contain water inside them and don’t really mix well with water. It’s better to go for soy-sauce or vinegar instead. Tamari Soy Sauce
Tips for Cooking Meat
- Crank up the Heat
When browning meat, we all aim to achieve that delicious, caramelized flavor and a fat, juicy crust on both sides, right? Well, you can easily do that by cooking the meat over a high temperature for a short amount of time! Triply Frying Pan
- Savor Each Bite
If you want steak cooking tips from the best chefs in the world, they all will agree on one thing, “it all comes down to how you season it”. And if you really want to relish each bite you take, we suggest seasoning it with some flaky sea salt just before serving it on the table! Flaky Sea Salt
- Let the Juice Spread
Done cooking? Awesome! Now let the meat rest for a bit! Whether you grill or cook a piece of meat, all the juice gets driven to its core and stays there. Once you let it cool, the juice gets enough time to spread everywhere and results in a tastier meal. Hibachi Grill
- Grab A Meat Thermometer

Whether you want a rare, medium-rare or well-done slice, the easiest way to determine if the meat is cooked properly is to stick a meat thermometer inside it. For instance, a whole beef is considered cooked once the internal temperature reaches 145-Degrees Fahrenheit. Meat Thermometer
- Handle with Care
While grilling meat, oftentimes, we tend to flip the meat carelessly with a carving fork. However, doing so might cause your protein to become drier and less flavorful! That’s why it’s recommended to handle meat with a tong or spatula for the best result. Tongs
- Bring Out the Flavor
Everyone LOVES a big, fatty, juicy Hamburger Patty, right? Well, if you want your meat to stay as juicy like that, then you must limit the urge to flip the patty too often as it results in less caramelization. Spatula
- Beware Of Carryover Cooking
Crisp bacon tastes yummy, but hey! You must take its carryover cooking into consideration as well! Some of the best bacon cooking tips include removing the pan off the stove when it’s just shy of your desired temperature and let it sizzle on the pan for a couple of minutes like that. Bacon Grease Container
Tips on How to Clean/Store Ingredients
- Go Green!
Instead of harmful bleaching agents, you can choose a greener alternative for washing the kitchen utensils. Simply fill your saucepan with White Vinegar or undiluted Hydrogen Peroxide and bring it to boil. You can also store this mixture in a spray bottle and use it to rinse dishes. Hydrogen Peroxide
- Keep the Blades Rust-Free
When it comes to kitchen knives, no matter what you do, food is going to get stuck on it at some point! To get rid of the debris, soak your knife in shallow water for one minute, rinse it off and pat it dry to keep the blades free from rust. Kitchen Towels
- Disinfect Storage Areas
To maintain proper hygiene, it’s important that you take care of the areas where you store the kitchen tools and equipment. You can use either a commercial disinfectant or a homemade mixture of bleach and water for this purpose. Commercial Disinfectant
- Use Air-Tight Containers
Did you know cocoa powder can last up to 2 to 3 years after you break its seal? However, you need to properly store it by putting the packet in an air-tight container and keep it in a cool, dark place. Air Tight Storage
- Liquify Honey If Crystalized
Honey crystallizes very easily even if you store it in air-tight containers! Don’t worry! You can still revive it by putting the bottle in warm water for 20-30 minutes. Honey
- Discard Cans
No matter how many kitchen tips and tricks you apply, it’s still hard to get rid of the unwanted tinny, off-flavor of leftover canned foods. It’s best to discard the can as soon as you open one and store the leftovers in an airtight container to retain its original taste. Air Tight Storage
Tips for Cooking with Stainless Steel
- Preheating Is the Key
Stainless steel comes with a porous, cold surface that needs to be preheated for a little bit for creating the optimal cooking surface! To ensure the meat gets a consistent temperature throughout your cooking, let the pan heat up for 2-3 minutes over medium temperature. AllClad Cookware
- Wait for the Release
Instead of flipping the meats too frequently, it’s better to do it once when one side is properly seared. In order to do that, wait for the pan to release the meat voluntarily and you don’t need a spatula to lever the meat anymore! Spatula
- Turn “Browns” To Flavor
Despite all your efforts, some of the fatty parts of the meat might just stick to the pan. Don’t worry, those brown bits are so full of flavor that they make the best sauces EVER! Just add water or stock to the pan and bring it to a boil to get the desired result. AllClad Cookware
- Look for Heavy-Duty Pans
Want to know some of the turkey cooking tips I have gathered through experience? Well, for starters, you will need a heavy-duty stainless-steel roasting pan with at least 2-inch thickness to prevent it from getting burnt! Also, use melted butter to bring out the flavor inside it. AllClad Cookware
- Time It Right!
Remember how we advised against flipping the meat too often? Well, to make things easier, you can use a timer for this purpose. Check your recipe and simply set the required time on your mobile to know when its time to flip again! Kitchen timer
- Season If Necessary
It’s hard to cook omelets in a stainless-steel pan as it never seems to come off easily! In that case, we recommend seasoning the pan by rubbing a small amount of oil all over its surface with a paper towel. AllClad Frying Pan
- Don’t Store Acidic Items
You can cook tomatoes and other citrus fruits in a stainless-steel cookware as much as you want. However, it’s better not to store these items in the pot for a long time as that might harm its surface in the long run. AllClad Frying Pan
Recommended Reading: Best Stainless Steel Cookware
Cast Iron Cooking Tips
- Warm It Up
Cast-iron is a little bit different than your regular nonstick pans and need to get warmed up a little bit before you place meat/veggies inside. However, you need to pre-heat the pan slowly as it might unevenly in some places otherwise. Cast Iron Cookware
- Use Metal Utensils Carefully
While using metal spatulas or other utensils, be careful about not brushing its exterior too hard! That might scrape off the seasoning on its surface. Spatula
- Take Precaution
The bottom of the cast-iron along with its handle gets pretty hot once you are done cooking! So, wear mittens and place a trivet on the table to protect its surface. Mittens
- Be Stingy With Oil
Cooking eggplants on a skillet for the first time? I have got some pretty good eggplant cooking tips for you! Slice the eggplant in half and brush one side with oil instead of pouring it in the pan to get the yummiest, non-oily meal EVER! E.V.O.O.
- Adopt Versatility
Cast-iron pans are super-duper adaptable to all situations! You can put these pans in the oven, on the grill and even over a campfire because it’s that much durable! Cast Iron Cookware
- Experiment If You Can!
The possibilities of coking things on cast-iron pans are endless! You should definitely try out all of its facilities by cooking the juiciest meat, frying your favorite fish fillets and baking brownies or desserts in it! Cast Iron Cookware
- Sweet Vs. Savory
As you already know, cast-iron skillets are an all-in-one product. However, to avoid the flavors get all mixed up, it’s best to use two different pans for the sweet and savory dishes you prepare. Cast Iron Cookware
- Be Gentle While Washing
You don’t need to baby this cookware all the time, but it’s recommended to use a natural, non-toxic dishwasher and warm water to wash these pans so that they can last for a long time. Cast Iron Cookware
Recommended Reading: Best Cast Iron Cookware
Crock Pot Cooking Tips
- Go for the Cheapest Cut
Inexpensive cuts of meat tend to be a bit fatty and thick, therefore, break down easily while keeping the juice intact while being cooked in the crockpot. That’s why you should choose your meat accordingly. Crockpot
- No/Little Stirring
No pick-a-boo while you cook! When you open the lid to stir, heat escapes from the crock-pot and takes a long time to get back to the same temperature again. Crockpot
- Add more Depth
As soon as you learn how to cook in a crockpot, you should also learn some tricks to add more depth to every dish! For instance, if you brown the meat and sauté some vegetables before tossing them into the pot, it will help add an intense, caramelized flavor and make the dish finger-licking good! Crockpot
- Use Flour to Reduce
Reluctant as your sauce is, you can still thicken it up by rolling the meat with some flour before adding them to the Crockpot. Or, you can also try mixing a little cornflour in the end and see if it does the trick!
- Go Slow
Unless you are in a hurry, we suggest using the lowest setting of the Crockpot to cook your meal. The slow and gentle heat of the pot is more likely to bring out the best flavor in the dishes and make the ingredients stand out on their own.
- Don’t Overcrowd
Need to cook a big meal? Use a bigger pot! Overcrowding a Crockpot will only result in a less-flavorful dishes and might even pose potential food-safety hazard! As a rule of thumb, fill two-thirds of the pot at most.
- Save Dairy for the Last
Want to know how to become a good cook? Learn from other people’s journeys! For instance, an experienced home cook will tell you to add sour cream, milk or other dairy-like products to your pot during the last 15 minutes of cooking for the best result! Crockpot
Wok Cooking Tips
- Break It In
Before you learn how to start cooking in a wok, you need to get the wok prepped first! Wash the pan with warm water and set it on a stove on high heat. Add 3 tablespoon of vegetable oil, scallions and stir-fry for 15 minutes. There you have it all seasoned now! Wok Pan
- Use the Right Oil
With wok, you should choose the oil that comes with a high smoking point. Peanut oil and Canola oil are better suited for this purpose. Peanut Oil
- Make a Plan
Wok LOVES the sizzling sound of toasted aromatics! Put garlic, ginger, chilies first, then add meat/seafood and throw vegetables at last to make a stunning dish for everyone! Wok Pan
- The Drier, the Better
The wok is all about the right temperature. As moisture can easily mess with that, we suggest drying all the ingredients with a towel before tossing them into the pan for the best result. Wok Pan
- Store Wisely
Although it’s perfectly safe to store food in the wok, it shouldn’t cross the time limit of 1 hour. Also, it’s recommended to remove vegetables from the wok as soon as it’s cooked. Otherwise, they might turn a pale yellow afterward and ruin the whole look! Wok Pan
- Slice It Up!
If your recipe calls for meat, cut it into thin, uniform slices across the grain for even cooking. Also, stir-fry the vegetables, such as Carrots and Potatoes before adding them to the same dish. Wok Pan
- Add Cornstarch for Gravy
Mix 1 tablespoon of cornstarch with ¼ cup of water and pour it over your dish to add a bit of sass to it! In case it becomes too thick, use warm water to lighten it up. Corn Starch
Recommended Reading: Best Carbon Steel Wok
Wrapping It Up
High heat, the sound of raw meat sizzling in the pan along with the sweet roasted aroma of ground spices is few of the scenarios found in a busy cook’s kitchen space!
No matter how much experience you gain along the way, every now and then you will find yourself watching your veggies get overcooked in the blink of an eye and screaming in frustration!
However, if you follow the cooking tips and hacks that we shared in this article, it’s possible to find a way out of every disaster you ever encounter from now on!
Hey! You know what that means, right?
You get to experiment, make mistakes, redeem, have fun and serve delicious home-cooked meals in the end without any fear of messing things up!